MoFi MasterPhono Phono Preamplifier

 When vinyl king, MoFi, finally made the move into hardware it sought out designers of proven pedigree – the MasterPhono is scripted by none other than Peter Madnick
MoFi Electronics has gone from strength to strength in the last few years, helped by the roster of designers drafted in to create its products. Spiral Groove's Allen Perkins worked on its UltraGold MC cartridge [HFN Jan '22] and MasterDeck turntable, while ex-TAD/ELAC Andrew Jones is responsible for its SourcePoint loudspeakers [HFN Apr & Aug '23]. Now comes the £5999 MasterPhono, a flagship phono stage from the pen of Peter Madnick, a designer best known for the iconic Audio Alchemy brand and his work as part of the Constellation Audio team.
This phono stage, the result of a two-year project, is effectively a twin-chassis product held between shared wooden sleeves that hold the power supply and amplification circuitry apart. MoFi wanted a single unit that would allow easy use in a studio environment if required, while Madnick was set on an outboard PSU, so the result is the 'best of both worlds' solution pictured here.
Inner Tubes
Look into the MasterPhono with the lid removed, and it's clear that it comprises two sections, separated by three copper-plated tubes. The front section (top of image) contains the unit's PSU, plus the microprocessor-based control circuitry behind the front panel, and connections between the relevant sections are carried through those copper tubes. The one on the right takes the input AC from the rear panel, the centre carries control signals between the front panel and the main circuits, and the left the DC supply from front to rear.
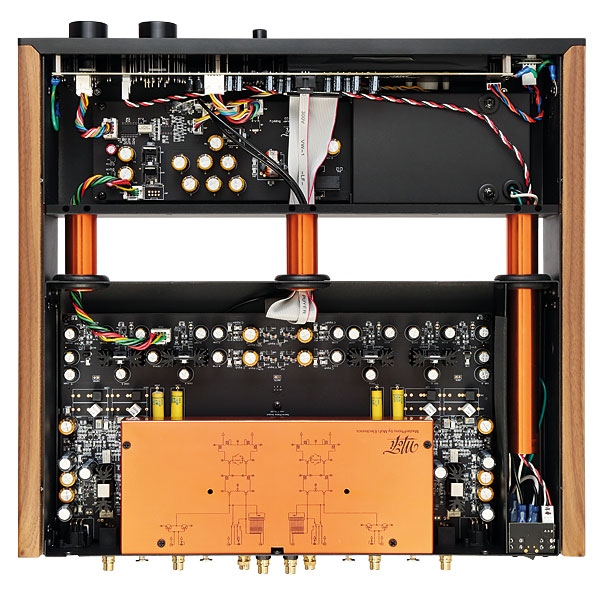
Meanwhile, at the back of the unit, the amplification circuitry is close to the rear panel and sockets in order to minimise signal path length. As for the FET-based front-end, this is housed inside a further copper box for both shielding and temperature control. Finally, all amplification within the MasterPhono is discrete and RIAA equalisation is passive.
The MasterPhono offers three inputs, selected on the front panel. Options 2 and 3 are conventional 'voltage' inputs on balanced XLRs and unbalanced RCAs, respectively. Gain options of 40, 50, 60 and 70dB and loading options of 15, 30, 50, 75, 100, 500, 1k, 10k or 47kohm are applied to both these inputs, but there is no defined 'MM' or 'MC' setting as such. There is also an 'OPT' setting on the load control that switches in a pair of rear-panel sockets to which can be fitted your own choice of loading resistor. There's no capacitance adjustment for MM cartridges – this is fixed at 150pF – although capacitors can also be fitted to the rear-panel loading sockets if desired. Both mono operation and a subsonic filter are also available.
Setup Saviour
Settings applied to each input are 'remembered' and recalled each time that input is selected. This ease-of-use is bolstered by the inclusion of a lovely, chunky remote control handset that will operate the MasterPhono's functions from the comfort of your chair, and makes cartridge loading comparisons a doddle. All switching is via relays, so there is a slight delay when changing settings, but this also means that adjustments can be made 'on the fly' with minimal fear of thumps through the loudspeakers.
Input number 1 is where things get interesting. This is a transimpedance or 'current' input, designed for cartridges with a very low, typically <10ohm, generator impedance. Low coil-count, low-impedance cartridges will typically deliver sufficient current in response to the near-shorted input of the MasterPhono's I-to-V stage. The four gain settings are still available, but the load switch LEDs are extinguished when the fixed-impedance Input 1 is in use.
The front-panel VU meters, which are bathed in orange light, not only look superb but can also aid in cartridge setup – I use The Ultimate Analog Test LP from Analogue Productions [AAPT1]. The test mode is instigated by a long press on the MasterPhono's 'Meter' button (which is otherwise used to switch the VU meters on or off). Setup is in three distinct steps. The first allows you to choose a reference level while the second tackles cartridge azimuth adjustment while playing a track with its two channels out of phase – the lower the meter reading, the better. The third step uses a 10kHz test track to check upper frequency output level as a guide to optimal load setting. If you don't happen to have any test gear to hand, this can remove a lot of the guesswork!


